|
|
At Home Projects
15 Organizational Tips for 15 days
A style sheet is a collection of style rules you establish for labeling files and documents. Adhering to these rules provides consistency and organization throughout your system.The fundamental part of labeling a document is to include: who, what when, and possibly where.
[Surname][first name][document type][year][location]
OR
[year][document type][surname][first name][location]
OR
Any combination that works for you!
Some examples:
Smith, John, Census, Boston MA 1930
Smith John, 1930, Boston MA, Census
Under SMITH
John, 1920, Census, Boston MA
A personal favorite: [Surname][First Name][YEAR][document type][location]
This creates a virtual timeline for each ancestor in your digital file:
Smith, John, 1910 Census, Boston, M
Smith, John, 1920 Census, Boston, MA
Smith, John, 1928, m. index, Boston, MA
Smith, John, 1928, m. Mary Smith certificate, Boston, MA
Smith, John, 1942, WWII draft record
Smith, John, 1944, Military records
Smith, John, 1949, Divorce Record, Lowell, MA
Smith, John, 1960, FAG
FAG = find a grave
m = marriage
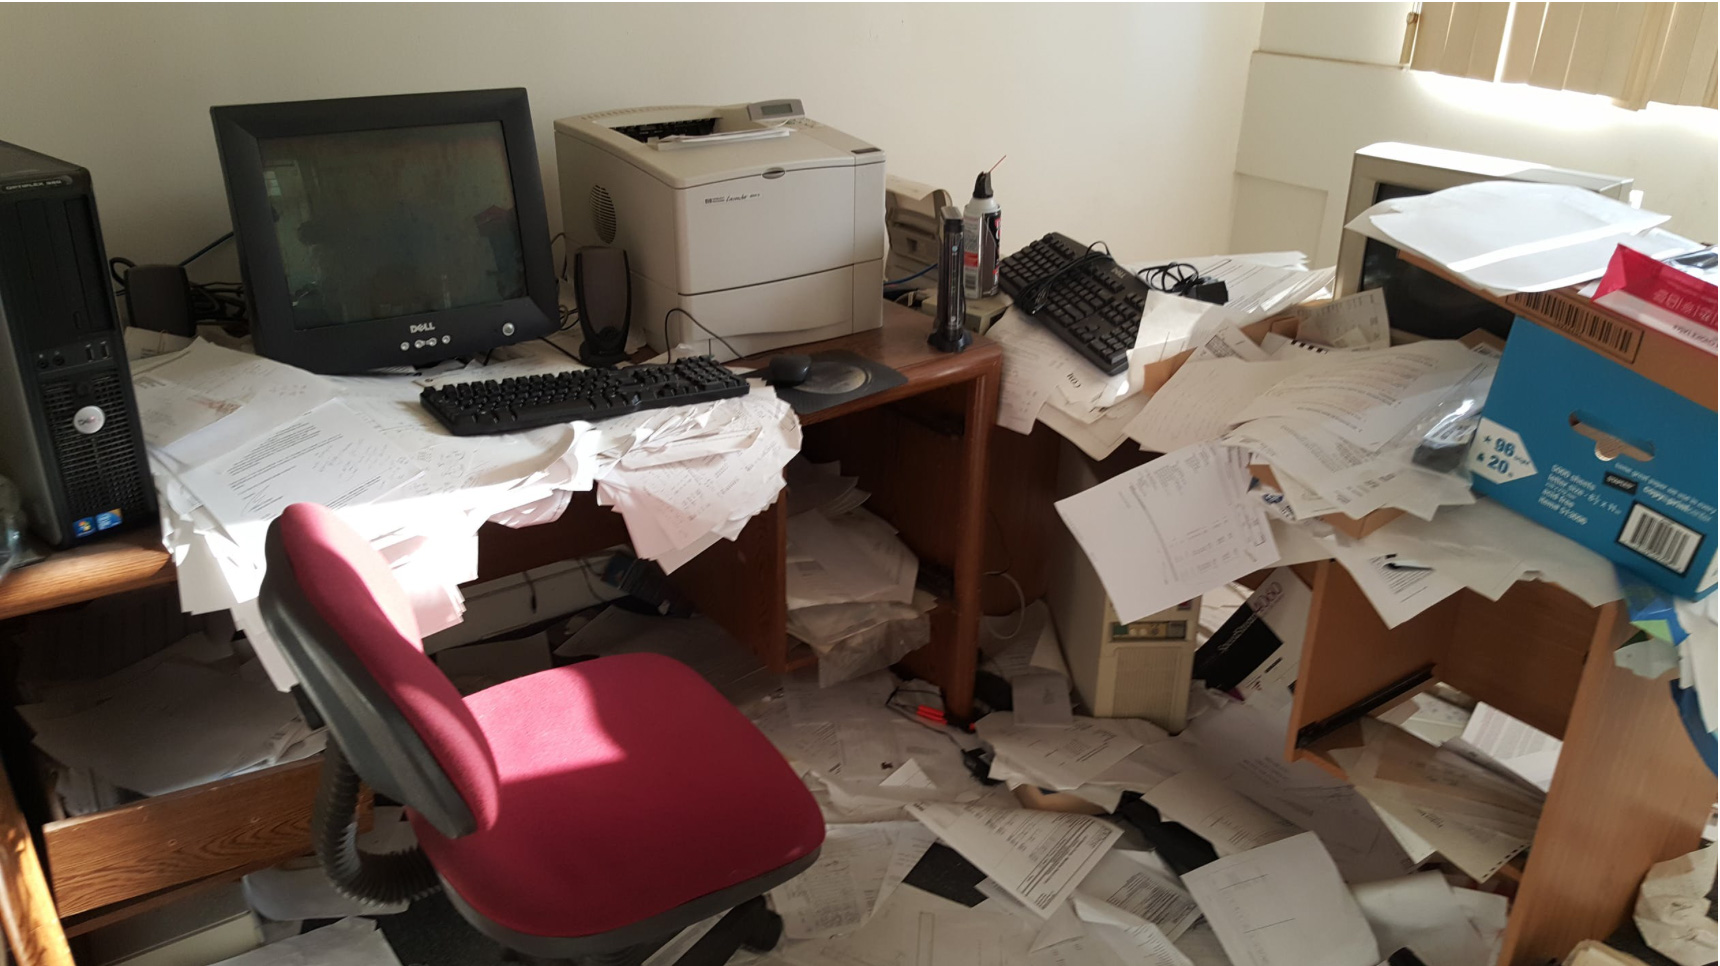 Does your genealogy workspace look like this? Does your genealogy workspace look like this?
- Are your binders or folders all labeled correctly?
- Have you filed that mile-high stack of printouts sitting on your desk?
- Do you have the supplies you need handy? Or should you place an order for staples, protective sheets, binders, etc?
- Can you find a document quickly and easily? If not, that folder / binder needs sorting.
Your digital files should be easily searchable and browseable. With your personal style sheet in mind, create a folder for every surname, and nested under every surname decide how you would like to organize your documents.
Two excellent articles to check out are:
Chances are that you've come across many websites that you'd like to save for another day. How do you save them? The most important thing is to keep it simple. You might want to create a folder in your favorites or bookmarks for every country and / or every state you research. Into that folder would go referece material that you want to look at when you're focused on that particular area.
Some additional suggestions for bookmarked or favorite folders:
Genealogy Videos
Heirloom Preservation
Land Records
Lineage Societies
Military (and within Military, subfolders for areas of interest such as Civil War, WWI, etc)
NARA
Old Occupations
Organization
Sources and Citations
You might want to break this down into sizeable projects, but the idea is to get started. Do you remember your style sheet? You can apply your style sheet to your digital photo organization. There are two main methods. One is to create a folder named something like Family Heritage Photos, and within that folder create a subfolder for each surname. Place your digital copies accordingly. The other method is to go to your Main Surname folder and within each person, create a folder of photos.
Example 1:
| |
Photos → Family Heritage Photos → |
Jones Family Photos |
| |
|
Smith Family Photos |
| |
|
Thompson Family Photos |
Example 2:
Genealogy → Surnames → Smith → Photos
Whatever system works for you, be consistent! This is an excellent article with additional information:
Many of us have boxes of loose photos that we have been meaning to digitize for years. Well – there's no better time than now.
Our smrt phones are one source with excellent scanning capabilities. A free scanning app for both iPhone and android is Adobe Scan. It's the highest tared mobile scanner by thewirecutter.com An upgrade for about $7 is ScanBot which is also highly rated. If you are using a flatbed scanner, make sure to keep the glass clean and adjust the scanner settings.
Now that you've scanned the originals, what do you do with them? You might choose to put them in an archival safe photo album or create a display or store them in archival boxes.
Some resources for archival materials:
While this sounds elementary, genealogy software is often underused. If yours comes with a handbook, try going through a chapter a week and learning to take advantage of all the hidden features. Can you color code (FTM Companion Guide, page 50)? Have you customized your Person View? Did you know that you can create a story, edit a photo and even create a slide show?
Now that your desktop, both virtual and real are organized, your binders or folders are all labeled and in order, your photos are digitized and your digital folders are all sorted – it’s time to work on organizing your genealogy software – whether you use Family Tree Maker, Legacy or some other software – it’s a good idea to run an Error Report from time to time to see if you have any inconsistencies or missing information.
To do this in FTM:
- Click on PUBLISH at the top of your screen
- On the left, under Publication Types, scroll down and highlight Person Reports
- Choose Data Errors Report
- You can customize this report:
- On the right, under Data Errors Report Options you can choose whether you want immediate family, extended family, all individuals (this will give you many, many pages) or selected individuals.
- Directly below the Data Errors Report Options bar, click on the first icon. A drop-down menu will appear with blue check marks next to facts that you may or may not want to include in your data errors. Uncheck anything that you do not need to see and run the report.
- This gives you a very good to-do list to clean up any errors you might have in your family tree.
Now that you’ve run an error report you know what information is missing. It’s time to get to work on that missing information. Most of us would rather research than fill out yet one more sheet or form – however, the proper use of a plan, log or checklist will save you time and help you avoid duplication of effort. While it is certainly not necessary to create a plan for each ancestor, it is very helpful to create a document for the particular ancestor you are focused on. This can easily be a combination of plan, log and checklist. State your questions, what you know, what you don’t know and where you’ve looked and what you’ve found or not found. The mere exercise of putting all this information together will help create a clear path of research moving forward. Check out our forms on the website under Resources and Links.
to the top
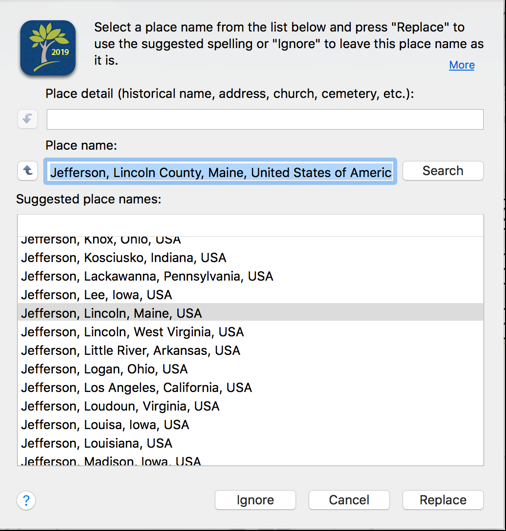
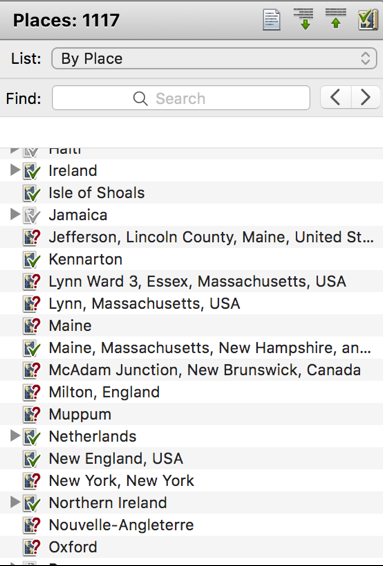 Do you have question marks next to your individual locations? Do you have question marks next to your individual locations? If so, highlight the location and right click. A pop-up menu will appear. Click on Resolve. A new pop-up menu will appear (see below). Family Tree Maker, in order to keep locations consistent, does not want the word "County" in the location, and wants to use USA instead of United States of America. Simply click on the new location, highlighted, and this place will nest under USA, under Massachusetts and under Lincoln county. Every person in your file who has this location in his or her facts will now be correctly listed.
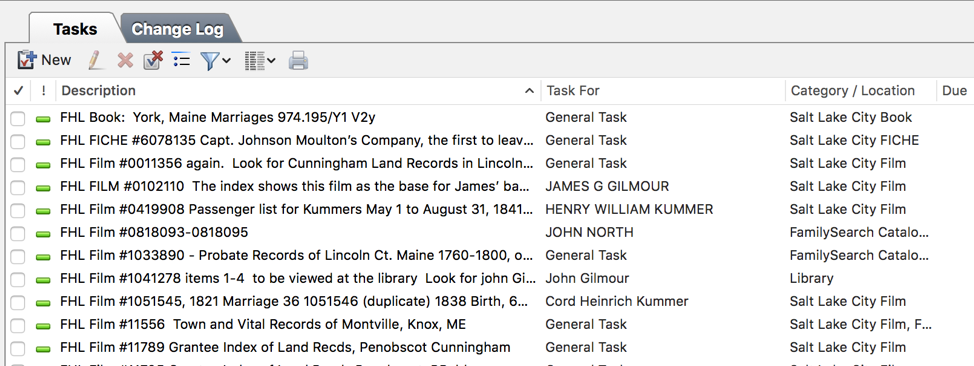
Do you use it? If you are planning a research trip at some point in the future or a trip to Salt Lake City, this will be one of the easiest ways to keep track of what to look for when you go. In FTM, the Task List appears in two different places: under PLAN and in the PERSON space.
If you maintain a consistent book or film naming system, your To-Do list will appear in numerical or alphabetic order. If you click on any one of the tasks, a pop-up menu will appear. It contains a space for notes. It's always a good idea to type in what you want to find in each book or film.
Do you use the notes section to add analysis to your documents? This is a great section to use to jot down what you know, what you suspect, what you’re missing. As you analyze your research, jot down your thoughts in the NOTES section.
I have a birth date for my 2nd great grandfather of November 9, 1809. I don't know where I found it, I don't remember how I got that date and I don't have a source for it. To avoid this type of mistake, add your citations as you go. Write then on every piece of loose paper that you print out and make sure that before you digitally file a document, you have it properly cited. There are two excellent websites with examples of citations:
Many times, we attend a presentation which provides excellent information, but we go home, stash the handout and forget much of the information. Now is a good time to go through your old handouts. Discard the ones that are obsolete or that don't pertain to your research. Establish a binder for the ones you will keep, or scan the paper copies and file digitally. While doing this, take a look at the links that appear in the handouts, make sure that these links still work and if they are of interest whether now or in the future, and add the links to your bookmarks. Look at any information that you might be able to use and highlight it.
You did it!
Give yourself a pat on the back if you've gotten this far in your organizational efforts and dedicate some time to doing that part of genealogy research that gives you the most joy!
|
|